Color Psychology: Understanding the Impact of Color on Emotions and Behavior
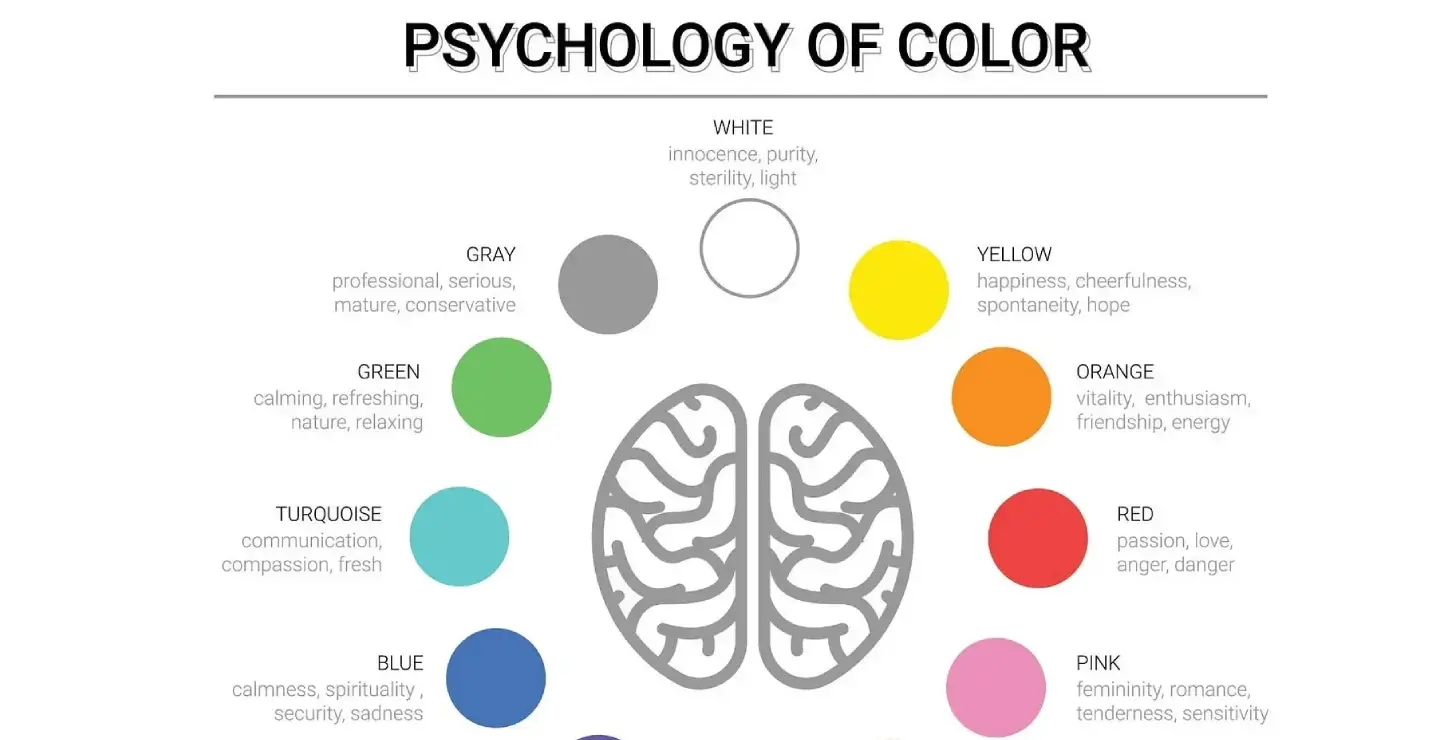
Fashion Courses Interior Design Courses Jewellery Design Courses UI/UI Courses Visual Arts Courses Other Courses OTHER COURSES Contact us Bengaluru Campus 1 : JD School of Design, No. 18-1, Brigade Road, Bengaluru,Karnataka – 560 001. Campus 2 : No. 40, Swan House, 4th Cross, Residency Road, Bengaluru, Karnataka – 560001. +91 9901 999 903 +91 9901 999 904 +91 9480 323 232 jdfashion@jdindia.com Goa Musthtifund Saunstha , Near Mahalaxmi Temple,Dada Vaidya Road, Goa-403001 +91 9606 096 060 +91 9606 048 888 jdfashion@jdindia.com Medium Color Psychology: Introduction Color Psychology is a fundamental aspect of the human experience, influencing our emotions, behavior, and even our physical well-being. The study of color psychology delves into the impact of different colors on human emotions and behavior, shedding light on the powerful role that color plays in our daily lives. From marketing and design to therapeutic settings, understanding the psychological and physiological effects of color can have a profound impact on how we perceive and interact with the world around us. Serena Archetti The Psychological Impact of Color Color psychology explores the idea that different colors evoke distinct emotional responses. For example, red is often associated with passion, energy, and excitement, while blue is linked to calmness, trust, and stability. These associations are deeply rooted in our biology and cultural experiences. Research has shown that certain colors can stimulate the release of specific neurotransmitters in the brain, leading to distinct emotional and physiological responses. Moreover, the use of color in marketing and branding has been shown to influence consumer behavior, with certain colors being associated with specific emotions and influencing purchasing decisions. For instance, the color red is often used to create a sense of urgency and excitement, while blue is frequently employed to convey trust and reliability. Understanding these associations can help businesses create effective branding strategies and connect with their target audience on an emotional level. Toptal The Behavioral Influence of Color In addition to its impact on emotions, color psychology also plays a significant role in influencing behavior. Studies have found that the color of a room can influence people’s behavior, with warm colors such as red and orange promoting social interaction and energy, while cool colors like blue and green can encourage relaxation and focus. The strategic use of color in interior design can be leveraged to create specific moods and atmospheres within a space, whether it’s a calming bedroom or an energizing office. Furthermore, the impact of color on behavior extends to healthcare settings, where color psychology can be utilized to create healing environments that promote relaxation and well-being. Hospitals and healthcare facilities often employ soothing colors such as soft blues and greens to create a sense of calm and comfort for patients and their families. Understanding the behavioral influence of color can help in designing spaces that support the well-being and emotional needs of individuals. Medium The Physical Well-being and Color Research has found that exposure to certain colors can have a measurable impact on our physiological responses, such as heart rate, blood pressure, and even the release of stress hormones. This has led to the use of color therapy in holistic healing practices, with the belief that certain colors can promote healing and balance in the body. For instance, the color blue is often associated with a sense of tranquility and is used in color therapy to help reduce stress and anxiety. Visme Conclusion In conclusion, color psychology is a fascinating and multidimensional field that explores the impact of color on human emotions, behavior, and physical well-being. From influencing consumer behavior to creating healing environments, the strategic use of color can have a profound impact in a variety of settings. By understanding the psychological and physiological effects of color, we can harness its power to create positive and impactful experiences in our daily lives. Whether it’s in marketing, design, or healthcare, the study of color psychology provides valuable insights into how we can use color to enhance our emotional well-being and improve our quality of life.